
Welcome to heissetipps, where we uncover the most brilliant and groundbreaking secrets for your home and garden! Today, we are going to revolutionize your understanding of one of summer’s most beloved fruits. Close your eyes and picture a watermelon patch. You probably imagine a vast, sprawling field of tangled green vines snaking across the ground, with giant striped orbs hiding amongst the leaves. This image is so ingrained in our minds that we assume it’s the only way. It’s the reason many home gardeners, with their limited yard space, sigh and think, “I could never grow that.” But what if we told you that this traditional method is not only space-intensive but also less effective for the home gardener? What if there was a method so clever, so efficient, and so visually stunning that it has started to amaze gardeners all over the world? A method that allows you to grow bigger, healthier, and more perfect watermelons in a fraction of the space. Prepare to have your gardening world turned upside down, or rather, turned on its side. We’re talking about growing watermelons vertically. This isn’t just a novelty trick; it is a profoundly better way for a home gardener to achieve their dream harvest, and we’re going to show you exactly how it’s done.
The concept of vertical watermelon gardening seems to defy logic, even gravity. Watermelons are heavy! How could a vine possibly support that weight dangling in the air? The answer lies in a combination of strong support structures and a truly “genius” secret weapon that we will reveal shortly. This method doesn’t just save space; it solves nearly every major problem that plagues the traditional ground-based approach. Think about it. When vines sprawl on the ground, they are in a constant battle. Air circulation is poor, creating a damp environment that is a breeding ground for fungal diseases like powdery mildew. The fruits themselves sit directly on the damp soil, making them susceptible to rot on one side and providing easy access for crawling pests like slugs and beetles. And finding the melons and checking for ripeness requires a jungle expedition, parting dense leaves while bent over in the hot sun. The vertical method elegantly solves all of these issues at once. It’s a paradigm shift that turns a messy, sprawling patch into a clean, organized, and astonishingly productive living wall of fruit.
Step 1: The Foundation of Strength – Choosing and Building Your Trellis
This entire method lives or dies by the strength of its support system. You cannot simply use a flimsy tomato cage or a delicate rose trellis. You are preparing to support dozens, if not hundreds, of pounds of fruit and vine. You must over-engineer your trellis for success. The gold standard and a favorite among serious vertical gardeners is a cattle panel. These are incredibly sturdy, welded wire grids, typically 16 feet long and about 50 inches tall. You can often buy them at farm supply or home improvement stores. You can install a cattle panel in a few ways: secure it firmly against a sunny wall or a very strong fence, or, for an even better setup, create an arched trellis by bowing the panel and securing both ends to the ground with T-posts. This creates a stunning watermelon tunnel you can walk through.
If a cattle panel isn’t an option, you can build your own ultra-sturdy trellis. An A-frame design is fantastic. Construct two rectangular frames out of 2×4 lumber and hinge them together at the top. Cover each frame with a strong wire mesh or netting, ensuring it’s attached securely with heavy-duty staples. Another option is to sink two strong wooden posts (4x4s are ideal) deep into the ground and stretch a reinforced wire grid between them. Whatever you choose, the key words are strong, sturdy, and secure. This is the skeleton of your vertical garden; don’t skimp on its strength. This structure will be the single most important investment in your world-amazing watermelon garden.
Step 2: Planting and Training Your Vine to Defy Gravity
With your super-sturdy trellis in place, it’s time to plant. For vertical growing, it’s highly recommended to start with smaller “icebox” varieties, especially for your first time. Cultivars like ‘Sugar Baby’, ‘Blacktail Mountain’, or ‘Golden Midget’ produce delicious, sweet melons that typically weigh between 6 and 12 pounds. Their smaller size makes them far easier to support. While you can grow larger varieties vertically, they will require an even more robust trellis and more diligent support.
Prepare your soil at the base of the trellis. As with any watermelon, they are heavy feeders and demand rich, well-draining soil. Dig in plenty of compost and aged manure. Plant your seeds or seedlings in hills right at the foot of your trellis. As the young vines begin to grow, your job as a trainer begins. The vines will naturally want to sprawl, but you must gently guide them upwards. When a vine is long enough, loosely tie it to the trellis using soft, stretchy material. Strips of old t-shirts, pantyhose, or specialized garden velcro are perfect. Never use thin wire or string, as it can cut into the growing vine and strangle it. Don’t tie the knots tightly; create a loose loop that gives the vine room to thicken. Continue this process, guiding the main vines up and up your structure. You are essentially teaching the plant its new way of life, encouraging it to reach for the sun vertically instead of horizontally.
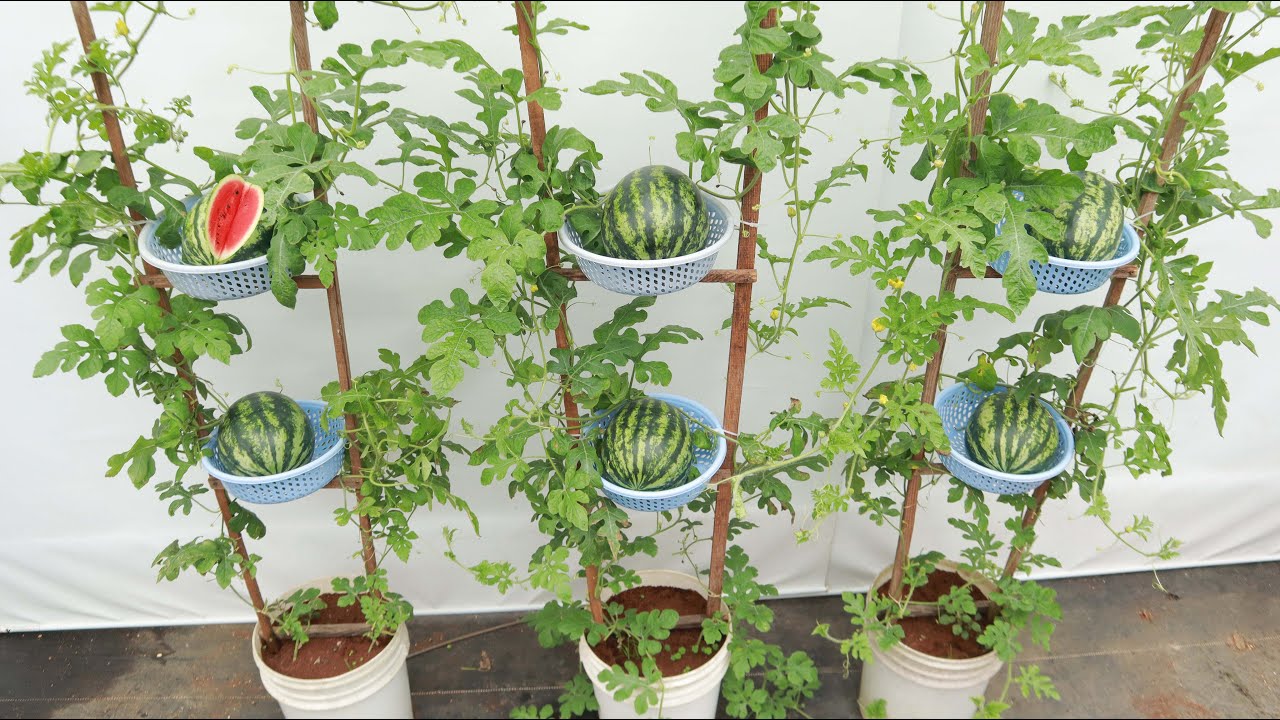
Step 3: The Genius Secret – Creating Watermelon Hammocks
Here it is. This is the “hot tip” that makes the entire system work, the part that amazes onlookers and ensures your success. As your vines climb, they will produce flowers, and soon, you will see tiny baby watermelons, no bigger than a marble, begin to form. As these fruits grow, their weight will quickly become too much for the stem to bear. If left unsupported, the melon will eventually rip itself from the vine long before it’s ripe. The solution is to create a personal sling, or a “watermelon hammock,” for each and every fruit. This hammock will bear the full weight of the melon, allowing the stem to do its only job: deliver water and nutrients.
The materials for your hammocks can be found all around your house. The absolute classic is a pair of old pantyhose. The stretchy, breathable nylon is perfect. Simply slip the developing fruit (when it’s about the size of a tennis ball or softball) into the foot of the pantyhose and securely tie the other end to the trellis structure itself. It is crucial that you tie the hammock to the trellis, not to the vine. The trellis is the support, not the plant. As the melon grows, the pantyhose will stretch to accommodate it perfectly. Other fantastic hammock materials include mesh bags that onions or oranges come in, squares of old t-shirt fabric, cheesecloth, or you can buy specially made melon cradles online. The key is that the material must be both strong and breathable to prevent moisture from being trapped against the fruit’s skin. Watching your wall of green fruit, each nestled in its own little sling, is a truly remarkable sight.
Step 4: The Benefits and Care of a Vertical Garden
Now that your system is in place, you will begin to see the incredible benefits. The improved air circulation around the leaves will dramatically reduce the risk of fungal diseases. Your fruit is held aloft, perfectly clean, safe from soil-borne rot and crawling pests. Pollination is often even more successful, as the flowers are prominently displayed for bees and other pollinators. Watering is more efficient as you can deliver water directly to the base of the plant without splashing the leaves.
The care from here on is straightforward. Water deeply and consistently until the fruit reaches its full size. Remember the secret to sweetness: cut back on watering for the week or so leading up to harvest to concentrate the sugars. Feed your plants with a fertilizer lower in nitrogen and higher in phosphorus and potassium once fruits begin to form to encourage sweet, healthy development. The best part is the inspection and harvest. There is no more hunting. Your beautiful melons are hanging right at eye level. You can easily inspect them for ripeness. Look for the three key signs: the tendril closest to the fruit’s stem has turned brown and dry, the “field spot” (which will be on the side or bottom) has turned from white to a creamy yellow, and the skin’s sheen has become dull. When it’s ready, simply snip the stem, untie your hammock, and enjoy the fruits of your amazing garden.
This method of growing watermelons vertically is more than just a space-saver. It is a smarter, healthier, and more productive way to garden. It turns the challenge of growing melons into an opportunity for creating edible art in your own backyard. It is a testament to human ingenuity and our ability to work with nature to create astonishing results. Imagine the look on your friends’ and neighbors’ faces when they see a living wall laden with watermelons, each one suspended perfectly in its own hammock. It’s a method that truly has to be seen to be believed. So this year, dare to be different. Dare to defy gravity. Build your trellis, train your vines, and get your hammocks ready. You’re about to grow the most amazing watermelons you’ve ever tasted, and that is a “heissetipp” that will bring you joy all summer long.thumb_upthumb_down